Saturday, 10 August 2013

PVA glue as a base for glitter polish?

As I was saying yesterday, glitter nail polish can be a total pain to remove, a while back I posted about Essence Peel Off Base Coat which allows you to simply peel off your polish in one coat saving you lots of time, hassle and scrubbing trying to get it off the regular way.
 
I've read that the Essence base coat is very, very similar to PVA glue (which makes sense, after all, who didn't used to paint PVA on your skin and then peel it off in sheets when they were at school?) so I decided to test the theory out for myself.


I bought a 500ml bottle of PVA glue from Poundland and applied two thin coats of it (using the brush from an old nail polish bottle I had lying around) to my bare nails.  As with the Essence base coat you need to wait a good while for it to dry, it could change from a cloudy milky sort of colour to almost totally clear - be patient though, it can take a while!
 
Once it's applied try to keep your hands out of water for as long as possible, obviously you can give them a quick wash if you need to but don't soak them in water or do the dishes and it's recommended that you avoid water altogether for 3 or 4 hours, so maybe do them at night before you go to bed.
 
After the PVA has dried, apply your polish as normal and then get on with life!  When you're ready to remove the polish should peel up in one solid piece without too much coaxing, a bit like this... 


Sometimes I find the edges are stuck down quite well so I just push gently against the edge of the polish to help pop it off, you can do it with your nail, your teeth or even an orange stick if you are feeling professional.  Once the edge is loosened they should all peel off pretty easily.

 
Leaving you with clean (slightly stained in my case) nails underneath (the staining has nothing to do with the PVA, that's just me being rubbish with base coat and wearing polish 24/7/365).  If you have any residue left then either wash your hands thoroughly or give them a quick swipe with nail polish remover to catch any odd bits left behind.
 

I found the wear time on the PVA base a little less than with Essence, although this might have something to do with me doing the dishes in leaky rubber gloves and therefor soaking my nails.  One nail was ready to peel up and pop off after just a day, the rest would have lasted a good bit longer but after one had gone I had to take them all off. 
 
For me that isn't a major issue, I rarely wear polish for more than a day or two and the PVA would allow me to do that but if you want a longer wear time then it probably pays to be more careful about soaking your nails in water.
 
Overall, I am pretty impressed, it's definitely a much cheaper alternative to the Essence base coat and very effective at removing glitter nail polish in a flash!  Next time I'm going to be more careful about keeping my hands out of water and see if I can get the wear time up to several days.
 
Have you tried PVA as a base?  How did you find it?


Friday, 9 August 2013

Nails Inc Sprinkles - Sweets Way

Using the fine sprinkles recently made me keen to dig out the original collection and try them again and I chose my favourite of the lot, Sweets Way, to put on.
 
 
Sweets Way is a pale blue base with pink, blue ad silver glitter packed in to it.

 
These pictures are three coats for full opacity, although two would probably have done.

 
The only downside of this polish is that it's a bit of a bugger to remove, check out tomorrow's post to see how I got around that issue...

Thursday, 8 August 2013

New Project - Ripple Blanket

 
I have some yarn left over from my giant granny afghan which needed using up (so I can buy more, obviously) so I decided to try out a slightly different pattern and make another smaller blanket.  I have no real idea what purpose it will serve once it's done though, maybe as a gift for someone, or maybe to throw over the back of one of the chairs on my living room.
 
I decided to use Attic 24: Neat Ripple Pattern.  I've tried a ripple pattern before and didn't like how it was turning out, it was slightly different in that it made deeper mountains and valleys and for some reason I just wasn't keen on it.  In hindsight I think a lot of that was to do with my tension but anyway I abandoned that effort and started a new version with Lucy's guidance.
 
The pattern isn't dead simple but it is pretty easy to follow and as long as I count my stitches and keep an eye on what I am doing it seems to work up pretty well...
 
 
There's been no real thought put into the colours, I am just planning on doing one stripe (2 rows) of each colour I have and seeing what size it ends up, if I have enough yarn and it's still small I will add on more stripes.  It's very much a work in progress with no real plan.
 
I do however love how it's turning out, the waves really are gorgeous so I think once I have mastered the technique I might buy yarn in specific colours to make a properly planned version of this blanket, for now I am quite happy to see where this one ends up. :)
 
I found the initial row pretty hard to do, I HATE crocheting into the starting chain, it's so fiddly and I never seem to have the right number of stitches (I had to squeeze the last two stitches in on this blanket as I was one stitch short to work into when I got to the end, it doesn't seem to have caused any major problems though).  I've also found that I need to keep an eye on my tension with this pattern too, if I'm not careful and let the stitches get too loose (as I am prone to doing) I end up with holes in the work so I'm having to be mindful to keep my tension nice and even all the way through, so far it seems to be going ok but time will tell!


My favourite thing about this pattern?  How easy it is to sew in your ends as you go!  No need for doing them all afterwards you can easily tuck them in and crochet right over the top of them.
 
I'll be back with more pictures and some progress news in a little while, I'm hoping this blanket works up quite fast as I have other ideas for my next project which I really want to get started on too.

Wednesday, 7 August 2013

Barry M Gelly Hi-Shine Passion Fruit

This is the colour I meant to try when I have my Mango repeat the other day, another of the new-ish summer Gelly Hi Shine polishes from Barry M.
 
 
As with all the Gelly Hi Shines, the polish applies beautifully and covers well in two coats.

 
Passion Fruit is a weird colour, sometimes it looks like a reddish orange, sometimes it looks like a pink and sometimes it looks like a pinkish red.  Other times I think there's a look of a very dark coral in there too.  Regardless it's a great colour; bright, vivid and very summer appropriate.

 
It's a little different from your standard red or pink but without being too out there so I could see it being popular with people who generally have more conservative nail colour preferences but want to try something a little different from standard.

Tuesday, 6 August 2013

Island Girl - Neon Pink Colour Change Nail Polish

On the train the other day I saw a lady with bright neon pink nails which put me in the mood to do a similar colour on my own nails that night.  My brother brought me this polish back from Las Vegas a while ago and it seemed like the ideal colour.
 
 
This is two coats over a white base to really make the colour pop.  The formula isn't great, hence the annoying streaks, but I do love the vivid neon colour.  The polish dried to a rubbery matte finish so I added top coat to give it a glossy shine.

 
The polish is supposed to be colour changing but to be honest it's hard to tell, it doesn't help that the colour changes from pink to very slightly darker pink so not really that much of a difference.  I could see a vague colour shift at my tips in very warm / cold environments but not enough to get a picture of, which is fine since I wore this one for the colour rather than colour changing effect.

 
Although I love the colour of this polish Barry M's LE Summer neon pink is pretty similar and applied much more nicely so if you're looking for a neon pink I'd probably try and grab that one rather than track the Island Girl one down.

Monday, 5 August 2013

Easy Nails - Fast & Fruity Nail Polish Remover

I posted about a year ago about these remover pots after only trying them out a few times and mentioned that I couldn't get my hands on them easily as we didn't have many Home Bargains store, and certainly none I could get to. 
 
Since then I have used the ones I had loads and been keen to track more down before my supply ran out.  Luckily I've also acquired the use of a car in that time meaning that Home Bargains is now within reach, so a few days ago I headed over to see if they still stocked the little pots of wonder...
 
 
They do!  So I cleared them out of their current stock meaning I shouldn't have to make the journey back in again for quite a while.
 
I'm not sure what they put in this little pot because for an acetone free remover it really does the job well!  Not only do they remove regular nail varnish super fast I also find them great for glitter polishes, which are notoriously hard to remove. 
 
I'm not sure whether it's the solution in the pot, the sponge or the combination of both but they work incredibly well, as well as being really handy to transport if you're going away somewhere or want to keep a remover in your handbag or desk drawer (no, just me who does that?).
 
Another benefit is that they smell pretty good too, there's no horrendously strong chemically smell just a sort of synthetic fruit fragrance which I find quite pleasant and they seem to be kind to my nails too, they never look dry or flaky after using this remover despite how quickly it removes my polish.
 
So, all in, for only 85p each, I LOVE these little pots of wonder, if you're in the market for a new remover or want something to rival the hideously expensive Bourjois version of a remover pot then look no further, Home Bargains might have a store near you!

Sunday, 4 August 2013

Pinterest & New Widget

 
If you're on Pinterest you might be interested in following my blog related boards on there.
I also have a whole host of other boards filled with random inspiration and potential future projects (for my nails and crochet) so feel free to head over and follow any of them if they seem like they'd be of interest.
I've also set up all my posts so you can click on the pictures and add them straight to your own Pinterest boards which I personally find really handy on other blogs when I want to remember something I've seen.  All you have to do is click on the smaller version of the icon below in each picture / post, that should open up a window allowing you to pin it right onto your board complete with a link - quite nifty if I do say so myself!


Saturday, 3 August 2013

Skinfood - Good Afternoon Rose Lemon Tea BB Cream

I've already blogged about two of the BB creams from this collection Peach Green Tea and Honey Black Tea, there's a shade comparison in the Honey Black Tea post too if you want to compare shade 1 and shade 2.
 
The third and final BB cream from the collection I have to post about is Rose Lemon Tea, I purchased this one in shade 1, the lighter of the two shades as that's what I use most.
 
 
Again, the packaging is lovey and feels very high quality and luxurious.  The scent of this one is quite like you might expect, a mix of citrus and florals, I'm not sure I would have pinned down lemon and rose without having known what I was smelling first but it's very pleasant none the less.

 
Here's what Skinfood say about this BB cream on the packaging:

 
I'm not quite sure what 'fitting' is when it comes to skin care but hydrating I can just about understand. ;)  I wasn't sure about the water drops but when you apply the cream you definitely notice them!  The consistency of the BB cream as it comes out of the tube seems like the other two but as you begin to blend it onto your skin it seems to almost split and become very watery.
 
At first I wasn't sure about it as it definitely feels a little odd and different to all the other BB creams I have tried but actually it applies beautifully and smooths easily over you skin to give a good even coverage.  It's slightly lighter in coverage than the other two in the range but despite this it left my skin looking great; really well moisturised, smooth and even in tone.  For such a light feeling product I was pretty amazed at how well it covered.
 
As for the 'bright morning skin' I would say it delivers, my skin looked really good with this one on - so much so I am tempted to go and order the darker shade so I can take it on holiday with me!
 
In general I am really impressed with this range, 2 out of three I really like and the third (peach green tea) I think will grow on me as my skin lightens up over the autumn and winter.
 
I got mine from sing-sing-girl and iamlove-shop on eBay for between £5-5.50 each which having tried them I think is a really good deal!  So if you fancy trying out a new BB cream I'd definitely recommend picking one of these up.


Friday, 2 August 2013

Orly - Galaxy Girl

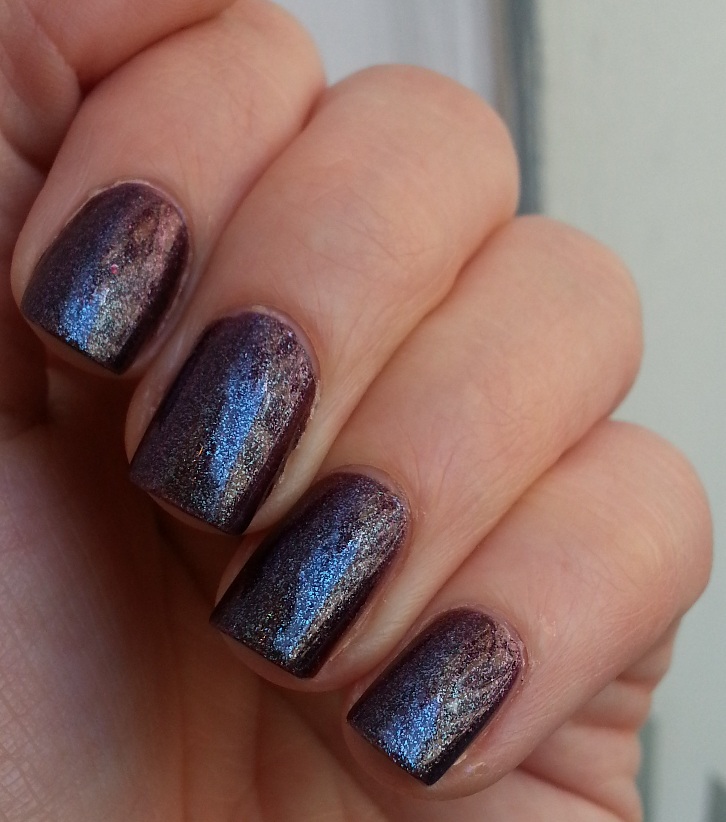
I decided to revisit an older polish today, Galaxy Girl is from the Orly Cosmic FX collection and was one of the first polishes I actually sought out online (after seeing it on a load of American blogs and reading about it on MUA) rather than just buying randomly.  I think it was also one of the first proper duochrome polishes I became aware of.
 
The collection was released in the summer of 2010, so 3 years ago now!  It's strange to think I have been obsessing about my nails and tracking down polishes for so long already. :D
 
Galaxy Girl is a deep wine shade which colour shifts through red tones to a blue / purple colour, there's even a bit of turquoise in there if you catch it at the right angle.
 
 
It reminds me a bit of Urban Decay's Bruise - although the Orly is a little more textured and grainy looking, it's a similar colours and colour shift though.  These pictures are three coats of polish.

 
It's a very pretty polish and the sort of thing that is ideal for people wanting something a little different to a flat colour without having to go all out; a sort of grown up, ladylike version of a nail effect or duochrome.

 
Putting it on again has reminded me of the other polishes from the collection so I might have to drag them out to try soon too.


Thursday, 1 August 2013

Current Crochet...

I have reached a bit of a dead end with my Giant Granny Afghan - originally I wanted to use each colour 4 times making it 96 rows in total (and then probably add 4 more to round it up to 100 for number neatness) but when I started doing the 4th row in each colour I realised that I didn't have enough yarn left in most colours.

 
Currently the blanket is 74 rows long and pretty huge (it's on my king-sized bed here for an idea of scale) so I'm not totally sure what to do with it, leave it as it is or buy more yarn to get it up to the 100 I was aiming for?

 
I am beginning to wonder if maybe 100 rows is a little excessive, if it was for the bed then maybe not as the afghan doesn't currently come all the way down to the bottom of the bed or right up to the top of the pillows but it's intended for use on the sofa when watching TV and it's definitely big enough for that at the size it is currently.

 
At the moment the plan is to use up the leftover Stylecraft yarn doing a smaller ripple blanket (post on that coming up soon, I hope) and then see how I feel after that about ordering more of the same colours.
 
In other news the blanket I made for my niece's first birthday has been delivered and was very well received, she was rubbing her face on it and wearing it as a cape within minutes of seeing it, which seems to me like she likes it. :D