Wednesday, 10 July 2013

Baby Blanket

I've finished the baby blanket I was working on, good timing since the young lady in question is 1 this month and it's to be part of her present.  I'm pleased with how it turned out, and while it's not perfect, I think it's definitely presentable enough to be given as a gift.
 
 
I like the way the colours have turned out so I am looking forward to using what's left of the yarn to make another blanket in the same shades, this time I think I might give granny sqaures a go.

 
I'm also pleased with how my border turned out, I wasn't following a pattern and I was worried the spacing might not be quite right but I think I've managed to pull it off, just.

 
I just hope the recipient and her dad like it!
 

Tuesday, 9 July 2013

Spa Ritual Nail Lacquer

Today I have two Spa Rituals colours to show you; a lovely green called Emerald City, emerald is the pantone colour of the year, and Out Loud one of the gorgeous new glitters from their Summer 2013 Collection - Laugh. 

Despite having seen Spa Ritual around before they are a brand I have never tried so I was keen to see what their polishes were like, first up a quick bottle shot of today's colours.


Spa Rituals describe themselves as a vegan luxury spa lifestyle brand:

Dedicated to the spa tradition, SpaRitual is committed to creating eco-friendly products and packaging perfectly crafted for the enlightened consumer. We use Vegan ingredients from around the world, including many specially sourced and selected plant essences that are wild crafted OR organic. The formulations are naturally coloured and free of synthetic dyes. SpaRitual is constantly monitoring sustainability issues and strives to be on the cutting edge of environmental awareness. Enlighten yourself. Be a SpaRitualist. Because we all deserve to live the good life.


Sounds good so far, and the bottles do have a lovely luxury feel to them. The larger bottle (15ml) is a very generous size and I love the rubberised caps, they make the bottle tops lovely and comfortable to hold and give really good grip. It's not something I've seen many polish brands do but I'm all in favour of it, it does add a little luxurious edge to the bottle while you're painting your nails. Even the smaller (5ml) mini bottle feel quite generous and substantial compared to other brands mini sizes, they feature the same rubberised cap.

Now, on to the actual polish, first up Emerald City.

I really like the colour of this polish, although I would say it seems more like a teal to me than emerald as the name suggests, nonetheless it's beautiful colour and super shiny, these pictures are without top coat and they still have a brilliant shine that you don't always get from polish alone.


Application wise the polish is lovely, very smooth and easy to apply. Although the polish is listed as a cream I would say it almost veers towards gelly texture as you do need three good coats to get full opacity with no visible nail line, the polish build up to an opaque finish beautifully.
 
The bonus of this slightly more sheer finish is that it looks like it might work well for a jelly sandwich manicure which is unusual from a darker shade so I am looking forward to trying that out in the future.
 

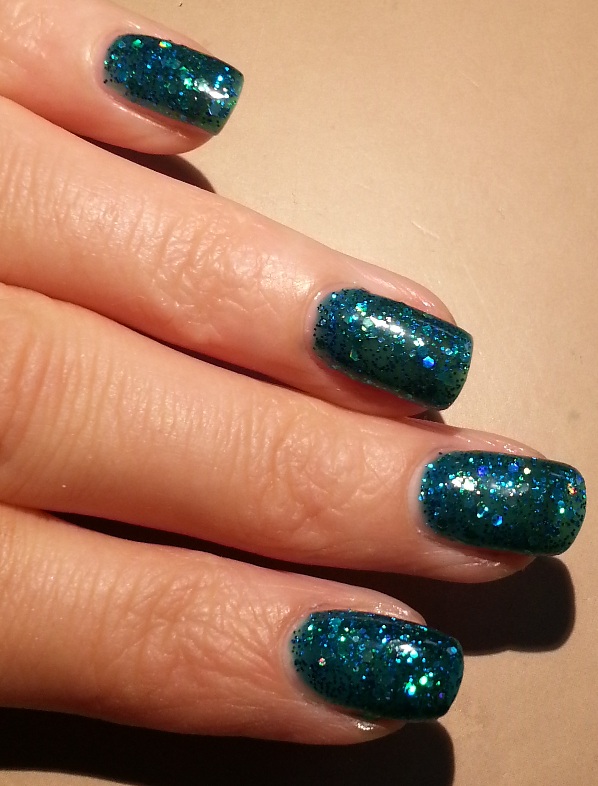
Next up Out Loud, this one is a real stunner, it's a dark blue base crammed full of green and blue and colour shifting hex glitter, even in the bottle it looks fantastic, I couldn't wait to try this one!


The base of the polish is quite sheer so you do need 3 good coats of polish to get it totally opaque on it's own however this really adds to the multi-dimensional look of the polish as you can see the glitter at different depths when all the coats have been applied. 

As with Emerald City this polish applies really well and it has the added bonus of you not having to fish around to pick up glitter from inside the bottle which can be a real issue with some glitter polishes.


Under bright light you can really see the glitter pieces sparkling and they seem to take on an almost holographic look changing from deep green and blue through brighter blue shades and even a bronze, so pretty and sparkly!

I decided to try Out Loud as a glitter topper over another polish (I used a dark green colour) to see how it fared that way too and I was not disappointed, although you don't get the same multi-dimensional effect as you do from using several layers the polish still looks fantastic and really adds some shimmer and glitter to the plain polish underneath.

Both polishes, and a whole lot more, are available from www.sparitual.co.uk prices start at £9.75 for 15ml and £5.50 for 5ml minis. They also have a selection of colours in their Sale where you could definitely pick up a bargain, some of the large 15ml sizes are only£5.00! 


*These polishes were sent for review.


Monday, 8 July 2013

Nails Inc Fine Sprinkles & Special Effects Set in TK Maxx

I popped into TK Maxx at lunchtime to pick up a present for some family we're visiting later for dinner, promising myself I would avoid looking at the nail varnish, and the scented candles, and the cookware too.  Truth be told there aren't many sections of TK Maxx I can be trusted in.  However, sometimes something is such a bargain you just have to buy it which is, funnily enough, what happened today.
 
I'd previously been eyeing up the Nails Inc 4 Piece Fine Sprinkles Collection on QVC which includes:
 
* Market Place - Lilac Sprinkles
* Langham Street - Vanilla Sprinkles
* Little Portland Street - Pink Sprinkles
* Devonshire Place - Mocha Sprinkles
 
So when I spotted a Nails Inc Colour Collection set in TK Maxx that looked very, very similar for just £12.99 I couldn't really resist.  It turns out it's not exactly the same set but very similar, the TK Maxx version includes:

 
* Special Effects in Warwick Street
(which oddly is often described online as a QVC exclusive shade with Blue, Red & Silver sprinkles but mine doesn't match that description.  Mine is the one shown here with multi-coloured sprinkles which I think is even prettier!)
* Langham Street - Vanilla Sprinkles
* Little Portland Street - Pink Sprinkles
* Devonshire Place - Mocha Sprinkles


I'm slightly sad to have missed out on Market Place as it does look very, very pretty but getting the other three and Warwick Street for such a bargain price will no doubt ease my pain in time. ;)

Poor macro shot of the multi-coloured glitter in Warwich Street:

 
After the excitement of my Nails Inc find I couldn't decide on anything suitable to take as a gift to dinner so it looks like it'll be a stop off to grab a bunch of flowers on the way over there, excellent shopping skills there, I'm sure you'll agree!

Look out for swatches coming very soon.


.

Sunday, 7 July 2013

Yankee Candles New Q3 Fragrances 2013

 
It's that time again, new quarterly fragrance releases from Yankee Candles.  I have to say I wasn't blown away by the selection this time but I was very keen on trying Salted Caramel and I wanted to give the others a go and see what they were like so I picked up a wax tart of each scent.


First up, what Yankee have to say about them:
 
November Rain
 A quiet interlude of the season is reflected in this airy, refreshing mix of watery leaf notes, warm amber and crisp, brisk air.
 
Lake Sunset
 The serene beauty of the sun's golden rays as they dip into still blue waters, calling to mind the musky descent of nightfall.
 
Vanilla Chai
 It's the perfect accompaniment to me time, a superbly satisfyingly rich and spicy recipe of ginger, cinnamon and vanilla.
 
Salted Caramel
 Sweet surrender is your with our luscious gourmand confection of burnt sugar, sea salt, and smooth vanilla caramel.
 
As predicted I LOVE Salted Caramel, it's rich and sweet and perfectly caramel-ly scented, no great surprise that I love it since the majority of my favourite Yankee scents are the super sweet gourmand ones like Christmas Cupcake and Red Velvet.
 
November Rain is ok, I think it's unlikely I would repurchase it, there are definite hints of air freshener about it to me and I don't think it's the sort of scent I want my home filled with although it isn't unpleasant.  Lake Sunset is nice enough and could grow on me but so far it's a bit lack lustre and not really blowing me away, it's another fresh scent which isn't bad but also isn't anything special.
 
Vanilla Chai was the one I was most curious about, I love ginger and I love vanilla but I really dislike cinnamon, I've never bought any of the Yankee fragrances that include cinnamon, this time I decided to give it a go hoping the ginger and vanilla might drown it out.  Sadly for me they don't, unlit I can smell the vanilla (and cloves and cardamon) but once it was lit this one was all cinnamon to my nose and very strong cinnamon at that.  It does have an amazing fragrance throw though, so if you like cinnamon then this is one for you.

Saturday, 6 July 2013

Maybelline Polka Dots - Chalk Dust

I first posted about these Polka Dot polishes from Maybelline HERE when I picked up the collection, today I decided to use Chalk Dust as a topper for the yellow varnish I had on the other day.

 
Chalk Dust has a clear base jam packed full of black and white round glitter particles in a variety of sizes, these pictures are two coats, you could get away with one but when it comes to glitter I tend to think more is more. :D

 
The polish dries to a fairly smooth finish and with a thick coat of top coat you will get completely smooth nails even after applying a couple of coats of the glitter.

 
I think the monochrome glitter gives a nice effect with the bright base, a bit like bees.

Friday, 5 July 2013

Quick Crochet

I bought a new Hol box from Ikea the other day which I want to use as storage for all my crochet yarn.  Since it's pretty sturdy when it's assembled I decided to buy a cushion for the top of it so it could also act as a spare place to sit when we had guests round, of course, a cushion needs a cover so I decided to use my scrap granny squares to fashion a temporary cover for it.

 
One side is made up of little granny squares I crocheted using scraps which were then joined together using the join as you go method - to see if I could get the hang of it.

 
The other side is made up of a larger square which is also made from scraps, I half had the idea in my head to keep adding to it whenever I had a spare piece of yarn which was too small for anything else but when I realised it was almost the perfect size to be the other side of my cushion cover I decided it would be better to use it for that.
 
It's very scrappy looking and doesn't really match but until I make something a bit more carefully planned out I think it does the job rather well.


Thursday, 4 July 2013

Another 4th of July theme manicure.

I was quite pleased with last years 4th of July manicure so I decided to give it another go this year, however I wanted to try and create a flag design on each nail rather than spread it across my hand like I'd done previously, and so this version was born...

 
This years attempt was a little bit more complicated than the simple stamping I did last year. 
 
First off I started with a white base then I used sellotape to mark off a portion of my nails which I stamped with Barry M Gelly Hi-Shine in Blood Orange to create the stripes, after that had dried I applied the tape again, this time covering the stripes and leaving the white area clear to paint with Barry M Gelly Hi-Shine in Blue Grape, on top of that I stamped white stars.  Then I removed the tape and added a topcoat to smooth out the joins.  Both of the plates I used for the stars and stripes are from the latest Cheeky collection of plates.

 
Aside from the small issue I had on my pinkie (we'll gloss over the lines not matching up, shall we?) I think these turned out pretty well, it's definitely obvious what they are meant to be and I've had lots of compliments already which is always nice.


Do you have any 4th related nail plans?

Wednesday, 3 July 2013

Barry M Summer 2013 Limited Edition Yellow

I posted a while ago about the new Summer 2013 Limited Edition Nail Paints from Barry M, two of which are avaliable in Boots and two in Superdrug.  This is the second of the Boots shades, a bright yellow.  This is the least neon looking of all the colours but it's still very bright and summery.
 
 
These pictures are two coats on their own, there's no need to put this yellow on over a white to make sure it's bright enough, it does that all by itself.  The yellow is a very bright, primary shade.

 
It's definitely a summer sort of colour, great for a cheerful burst of colour.


Tuesday, 2 July 2013

Highlighter Green

Can you spot a theme here?  I decided to try out another of the Barry M LE Summer Neon collection, this time the green from Superdrug.

 
This one was VERY sheer, these pictures are two coats over a white base and they look pretty patchy, I even went over a few with a thicker coat the second time around but they could still really do with a third to make them properly opaque and even all over.

 
The colour is nice; bright and zingy with a definite hint of neon but it doesn't quite have the lurid, garish hue (I mean this in a good way ;)) of the yellow and darker pink I've posted recently.  It's more on a par with the lighter pink I used as an accent nail, bright but not full in your face neon.

 
I'm tempted to try adding another couple of coats over this before I take it off, just to see if it gets more even and bright then, but chances are something else will take my fancy before I bother.

Monday, 1 July 2013

YRNails Full Nail Wraps

Recently the lovely people at YRNails sent me some water decal nail wraps to try out.  I'd seen these on a few website so I was keen to try them out.  I've used and liked regular water decals before so I was hoping the full nail sized wraps would give a similar effect.

There are three patterns in this post today, and I'll admit they did take me a little time to get used to but once you have the hang of it they are a very effective way to get a pattern all over your nail without too much effort.  First up Grungy Outline Tree:


As you can see I had a little bit of trouble with a couple of these which I think was down to my water being too warm and also trying to apply them when they were too wet, the pattern can smudge a bit if you rub the decal around too much which is unfortunately what I did.  Not too bad for a first try but I definitely need to work on my application technique!


Next Grungy Red Tree, this is the same as the first pattern but in a different colourway, this time a red and rust sort of colour.  Again I had issue applying these so I'm sorry for the not perfect photos.


I do think it's a technique which can be mastered though and the patterns are very pretty.


Third time lucky, this time I applied Colour Splatter 1 and I'm much happier with how it looks, it's still not perfect, especially in the macro shots but these ones look much better.  I love this pattern too, it's definitely the sort of thing that full nail wraps were made for, how else could you get this sort of effect without taking hours and hours over it?


Each set of wraps come with an instruction leaflet and if you're new to full nail wraps then definitely give it a read over as they do have to be applied in a slightly different way to normal decals.


YRNails have a whole selection of full nail wraps starting from just 75p a set on there site along with regular decals too so if they sound like your kind of thing head over and check them out: http://www.yrnails.com/


* These products were sent to me for review.